Clearing a Sure Start BIOS Password on an HP EliteDesk 800 G4 Mini
September 2026
I bought a used HP EliteDesk 800 G4 Desktop Mini off eBay to turn into a locked-down computer for my kid. It arrived running Windows fine, but the moment I tried to change the boot order to reinstall the OS, I hit a wall: a BIOS Administrator Password I didn't have and the seller couldn't provide.
If you have landed here with the same problem, this is the writeup I wish I had found. It documents a method that actually works on the G4 Mini, what to avoid, and why the usual advice fails on these machines.
These machines use HP Sure Start. It keeps a protected "golden" copy of the BIOS in a separate flash chip and actively repairs tampering. That kills every quick fix people usually try:
- • Clearing CMOS with the onboard button does not remove the password. HP's own service documentation states this outright.
- • Pulling the CMOS coin cell does not remove it either.
- •The PSWD jumper trick, which works on older HP desktops, might brick a G4 Mini. One user on the Badcaps forum bricked 3 out of 5 units this way.
- • The old "enter the wrong password three times to get a disable code" backdoor is gone on this generation. You just get "System Locked" and nothing to work with.
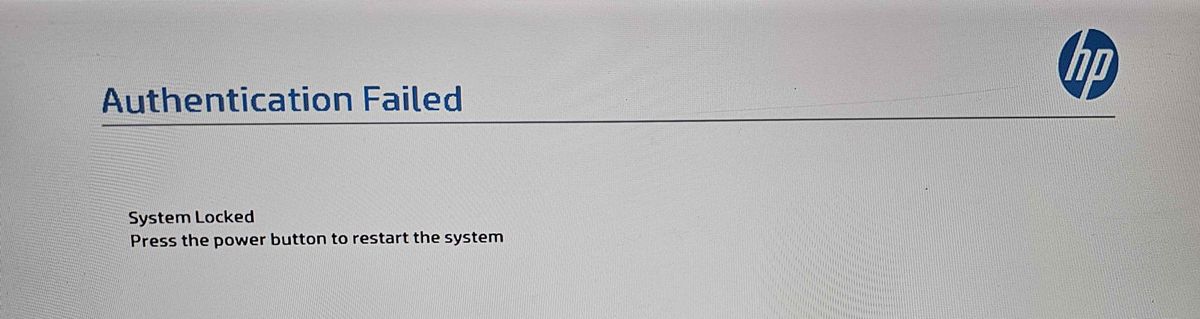
So the machine boots into Windows, but you have no real control over the device. For my purposes that was a dealbreaker.
The idea behind the fix
Sure Start stores its protected data, including the password, on a dedicated flash chip. On the G4 Mini board that chip is labeled XU68 PRVROM in the silkscreen.
Grounding the data-out pin on that chip during boot prevents Sure Start from reading it. When the read fails, the system seems to fall back to a recovery path that rebuilds the chip contents from a clean baseline. The password doesn't survive the rebuild.
The pin you ground is pin 2 (data out) on XU68. You hold it to ground while the machine powers on.
I adapted this from Rhys Goodwin's excellent writeup for the G6 Mini (linked at the bottom). The chip brand differs between generations but the pinout and the concept carry straight over.
Identifying the chips
The board conveniently labels both flash chips in the silkscreen. Look for these two.
XU21 BIOS is the main BIOS chip. On my board it was a Winbond W25Q256JVFQ in a 16-pin package. Leave this one alone for the wire method.
XU68 PRVROM is the target. On my board it was a Winbond W25Q128JVSQ, an 8-pin chip, located beneath the drive housing (which I needed to remove to get to the chip).
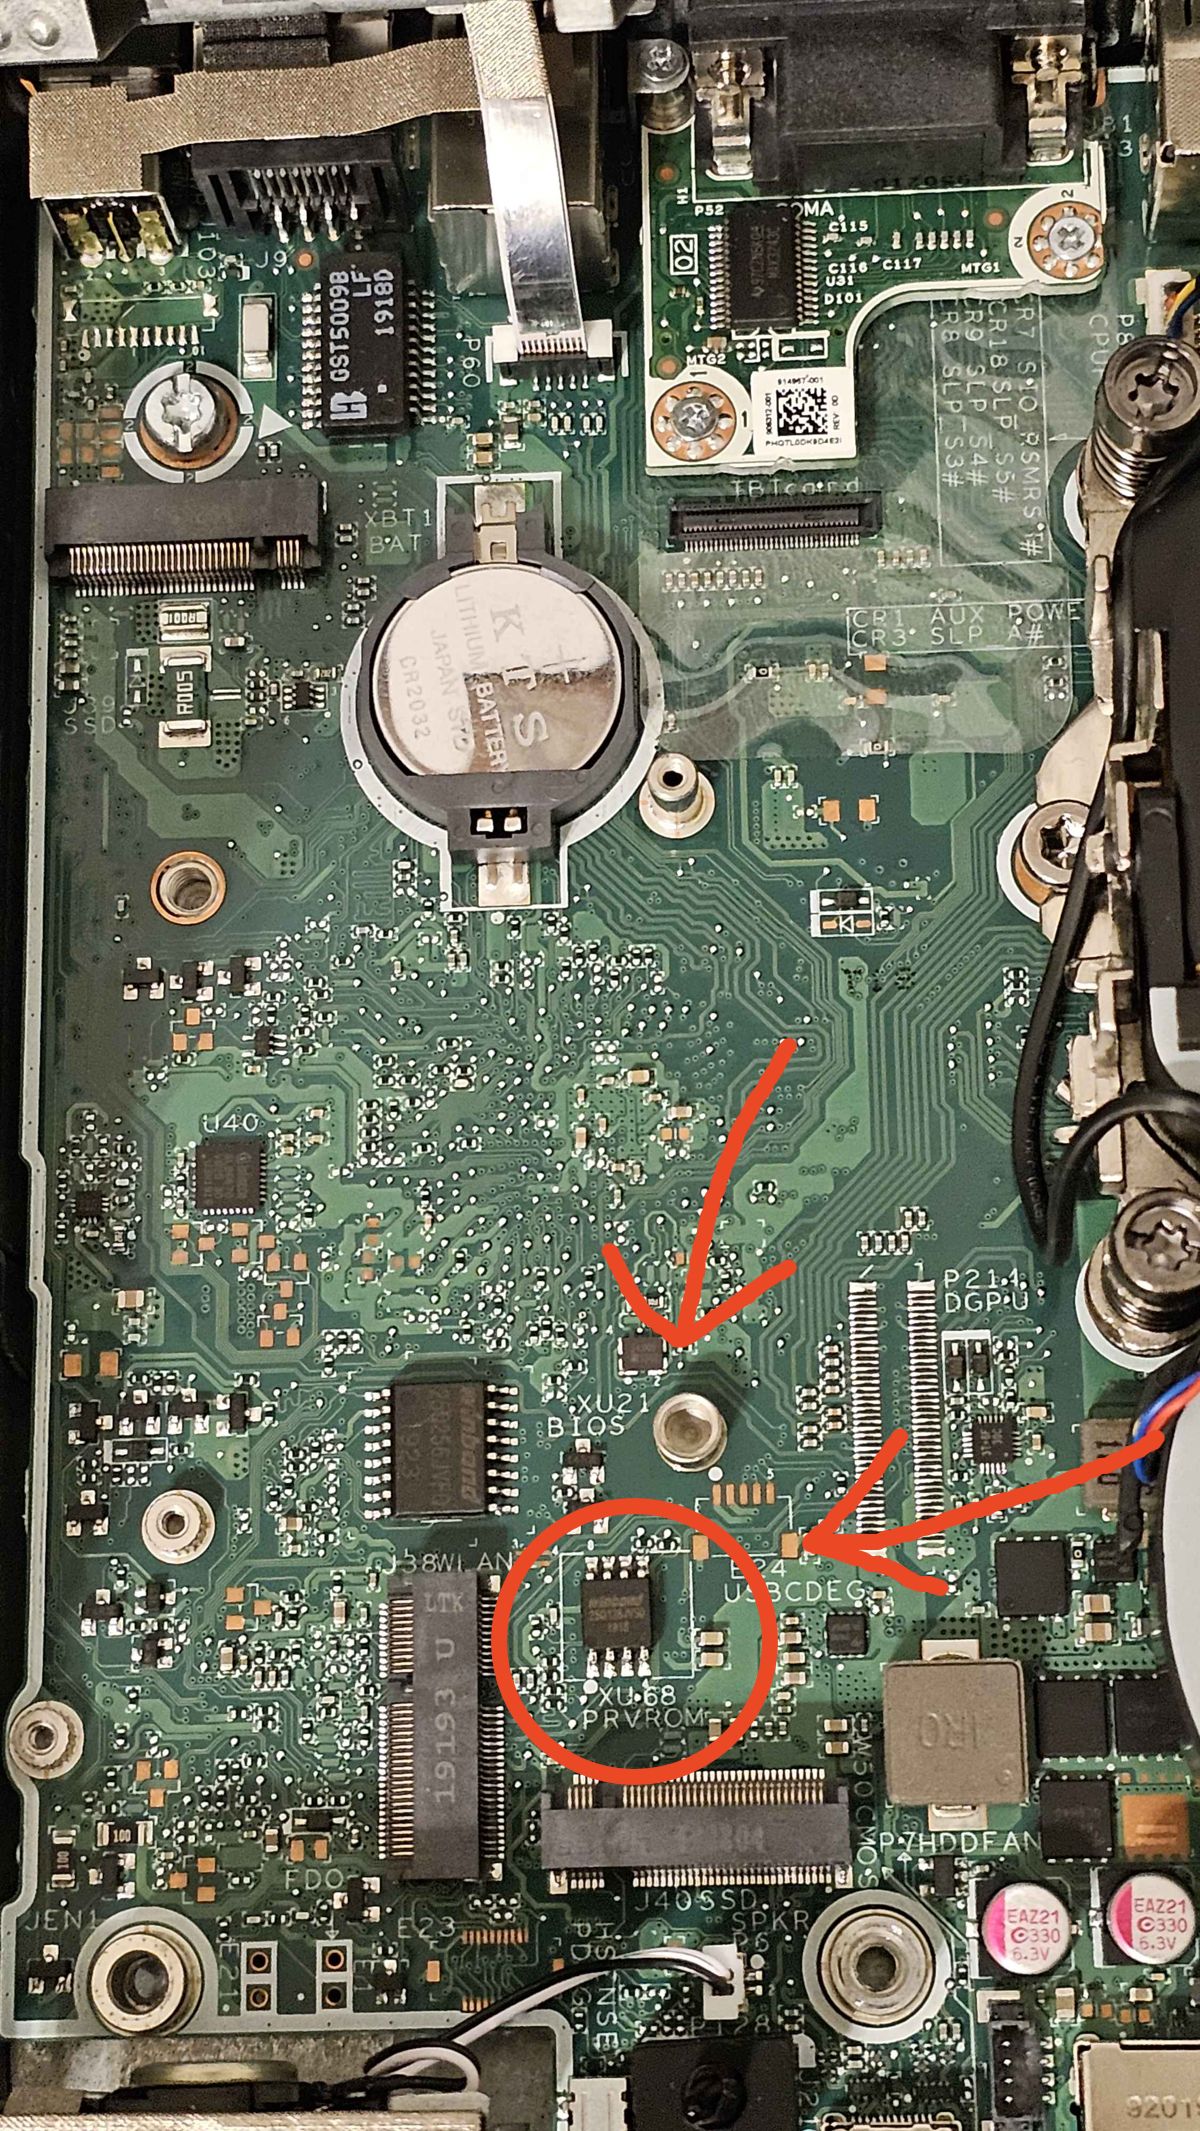
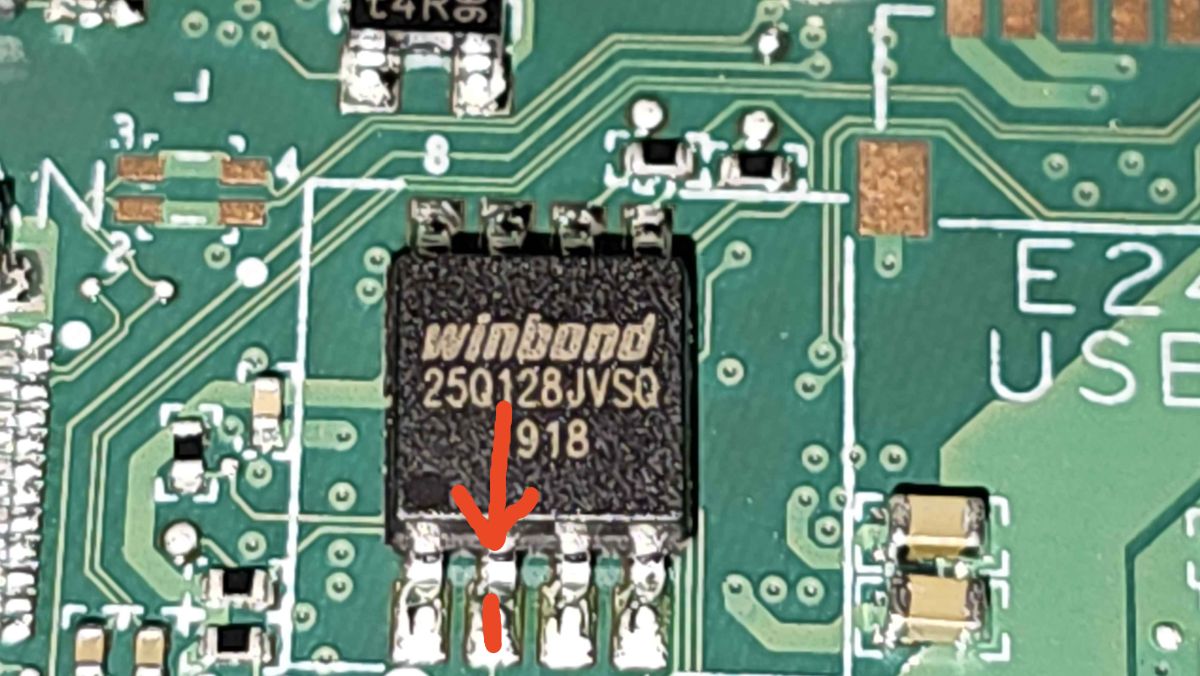
The W25Q128JVSQ (see page 5 in the datasheet) uses a standard SPI flash pinout, the same layout as the GigaDevice chip in Rhys Goodwin's G6 guide:
| Pin | Function |
|---|---|
| 1 | CS (chip select) |
| 2 | DO (data out) - this is the one you ground |
| 3 | WP (write protect) |
| 4 | GND |
| 5 | DI (data in) |
| 6 | CLK |
| 7 | HOLD / RESET |
| 8 | VCC |
Pin 1 is marked with a small dot on the chip. Pin 2 sits directly next to it on the same side.
What you need
Not much. A short length of wire with the ends stripped works. A straightened paperclip works. Small alligator clips help a lot if you are doing this alone, because you need one hand free for the power button.
No programmer and no software required for this method.
Getting inside
Take out the single rear screw, slide the cover off, disassemble the drive caddy and lift it clear of the board. The XU68 chip sits in the lower area near the XU21 BIOS chip.
The procedure
- 1. Kill the power. Unplug the power brick completely.
- 2. Find pin 2 and a ground. Pin 2 is next to the dotted pin-1 corner on the XU68 chip. For ground, any bare metal standoff or screw hole on the board works.
- 3. Rig the wire. Get one end held firmly against pin 2 and the other end on ground. Doing this solo is the awkward part. I bent a wire so it braced itself against the pin and clipped the other end to maintain contact with a standoff, which freed up a hand. If you have shaky hands, you may want to use multiple fasteners to keep the wire in place. I managed to get this on my first try, and I wouldn't want to find out what happens if you don't get it right and somehow cause a short elsewhere.
- 4. Power on with pin 2 grounded. Keeping that contact, plug the brick back in and press the power button. Expect the power LED to blink red and white. That is fine.
- 5. Remove the wire and power off.
- 6. Do not panic. The machine will now refuse to power on at all. This is expected. Unplug the brick again and tap the power button a few times to drain residual charge. Give it a couple of minutes.
- 7. Power on and wait. Plug in, power on, then leave it completely alone for at least five minutes. It may cycle on and off, throw blink codes, and sit on a black screen. On mine the code shifted to five red then two white during this stage, which is a BIOS recovery state, not a death sentence. This is Sure Start rebuilding itself. Let it cook.
- 8. Windows repair. Mine dropped into Windows automatic repair on its own because the earlier boot got interrupted. I let it finish.
- 9. Check the BIOS. After it settled and rebooted, I spammed Escape to reach the HP Startup Menu, then went into BIOS setup. No password prompt!! Success!
Confirming it worked
In the Security tab, the giveaway is the wording. You want to see Create BIOS Administrator Password, not "Change." Create means nothing is set.
You will also notice Sure Start BIOS Settings Protection is greyed out with a note that it requires a BIOS Administrator Password to be set. That is the state you want. With no password, Sure Start has nothing to enforce.
While you are in there
Set the boot order so USB boot is allowed, since that was probably the whole reason you needed in. Decide whether you want to set your own BIOS password. I left mine blank on purpose. A password re-arms Sure Start protection, and for a home machine I would rather never risk locking myself out again.
Methods I did not use, for completeness
There is a cleaner, more controlled route using a CH341A programmer, roughly a ten dollar tool, with a chip clip. Two variants of it are documented as working on G4 units:
- • Read the XU21 BIOS chip, run the HPUnlocker Python script by Georg Sieber against the dump to strip the password, then flash it back. This needs a 16-pin clip.
- • Or erase the XU68 PRVROM chip directly and let Sure Start recover it clean, which is the same outcome as the wire trick but done with a programmer instead of a jumper.
If you would rather not power on a live board with a wire held against a pin, the programmer route is probably worth the small wait for shipping, but if you are adventurous and impatient, you might wind up with a fun story to tell.
Do not use the PSWD jumper
Sources
- Rhys Goodwin, HP Elite 800 BIOS password removal (G6 Mini)
- Georg Sieber (schorschii), HPUnlocker script
- Badcaps forum thread on G4 Mini BIOS recovery (bricked units, programmer method)
- HP EliteDesk 800 G4 Desktop Mini Maintenance and Service Guide (PDF)